HttpClientでHTTPSのwebデータをGETする
こんにちは、くろべこです。
前回の記事では<ESP8266HTTPClient.h>を使用してJSONフォーマットのボディデータをGETしました。この時の通信プロトコルはHTTPサーバーだったのでクライアントからGETリクエストする際に特別なやり取りをする必要がありませんでした。

今回は【HTTPS】のサーバーからボディデータをGETするためにはどのようにすればいいか取り上げていこうと思います。
そもそも【HTTP】【HTTPS】とはウェブサービスを閲覧するときの通信取り決めです。HTTPはハガキのように配達員などの第三者からのぞき見が可能ですが、HTTPSは封書の様なものなので第三者からは閲覧できないような通信取り決めとなっています。
参考リンク:HTTPとは、HTTPSとは?
では、Arduino環境下でHttpClientを使用してHTTPSのウェブサービスにアクセスするために何が必要かというと【FingerPrint:フィンガープリント】が必要になってきます。
FingerPrintの調べ方
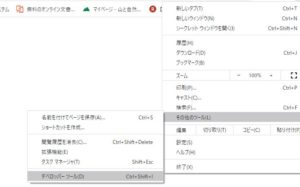
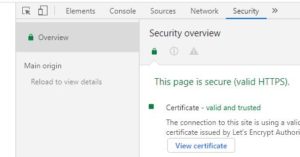
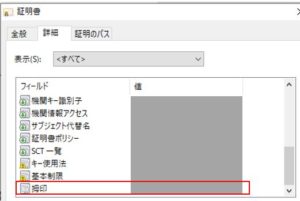
一度HTTPSサービスにアクセスするとフィンガープリントはクライアント側に保存されますが、どこで確認できるのでしょうか?
GoogleChromを例にして確認方法を説明したいと思います。
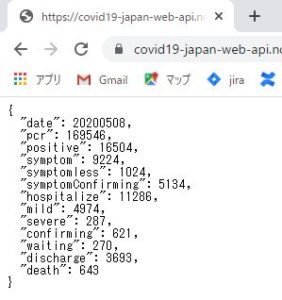
■まず、先ほどのAPIにアクセスしてみましょう
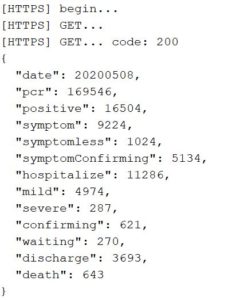
JSON形式の文字列が表示されます。
HttpClientでHttpsにアクセスしてデータをGETする
使用するArduinoコードはサンプルプログラム【BasicHttpsClient】を参考にしています。
先ほど、控えておいたフィンガープリントは2桁16進数20組の配列表記に直す必要があるのでちょっとめんどくさいです。
|
1 2 3 4 5 6 7 8 9 10 11 12 13 14 15 16 17 18 19 20 21 22 23 24 25 26 27 28 29 30 31 32 33 34 35 36 37 38 39 40 41 42 43 44 45 46 47 48 49 50 51 52 53 54 55 56 57 58 59 60 61 62 63 64 65 66 67 68 69 70 71 72 |
/* * HTTPSのコロナAPIにアクセスしてJSONデータをGETする */ #include <Arduino.h> #include <ESP8266WiFi.h> #include <ESP8266WiFiMulti.h> #include <ESP8266HTTPClient.h> #include <WiFiClientSecureBearSSL.h> // Fingerprint for demo URL, expires on June 2, 2021, needs to be updated well before this date const uint8_t fingerprint[20] = {0xd2,0xb8,0xf1,0x80,0xac,0x29,0x63,0xf8,0x22,0xaa,0x9e,0x99,0x4d,0x73,0x7b,0x59,0x3b,0x92,0xb4,0xe8}; ESP8266WiFiMulti WiFiMulti; void setup() { Serial.begin(115200); // Serial.setDebugOutput(true); Serial.println(); Serial.println(); Serial.println(); for (uint8_t t = 4; t > 0; t--) { Serial.printf("[SETUP] WAIT %d...\n", t); Serial.flush(); delay(1000); } WiFi.mode(WIFI_STA); WiFiMulti.addAP("*****", "*****"); } void loop() { // wait for WiFi connection if ((WiFiMulti.run() == WL_CONNECTED)) { std::unique_ptr<BearSSL::WiFiClientSecure>client(new BearSSL::WiFiClientSecure); client->setFingerprint(fingerprint); HTTPClient https; Serial.print("[HTTPS] begin...\n"); if (https.begin(*client, "https://covid19-japan-web-api.now.sh/api/v1/total")) { // HTTPS Serial.print("[HTTPS] GET...\n"); // start connection and send HTTP header int httpCode = https.GET(); // httpCode will be negative on error if (httpCode > 0) { // HTTP header has been send and Server response header has been handled Serial.printf("[HTTPS] GET... code: %d\n", httpCode); // file found at server if (httpCode == HTTP_CODE_OK || httpCode == HTTP_CODE_MOVED_PERMANENTLY) { String payload = https.getString(); Serial.println(payload); } } else { Serial.printf("[HTTPS] GET... failed, error: %s\n", https.errorToString(httpCode).c_str()); } https.end(); } else { Serial.printf("[HTTPS] Unable to connect\n"); } } Serial.println("Wait 10s before next round..."); delay(10000); } |
基本的には前回解説したHTTPページへのアクセスとほとんど変わりはありません。
変わっているところは例の【フィンガープリントによる認証】です。ヘッダーでいうと <WiFiClientSecureBearSSL.h>ですね。
|
1 2 3 |
std::unique_ptr<BearSSL::WiFiClientSecure>client(new BearSSL::WiFiClientSecure); client->setFingerprint(fingerprint); |
上記の部分でclientのメンバにフィンガープリントの値を入れているのかな?と思います。
このようにすることでHTTPSのページにアクセスしてデータをGETすることが出来ます!!
という事で、HttpsにアクセスするときはESP8266HttpClientヘッダに加えて
- アクセスしたいページのフィンガーコードを確認する
- WiFiClientSecureBearSSLヘッダを入れて、フィンガーコードをclientオブジェクトに適応する
という事に気を付ければ、あとはHttpにアクセスする時と一緒でした~




コメント